If your lawn or landscape retains water, you need a functional drainage system to protect your property from water damage. Water pooling in your yard, driveway, or near your home's foundation can lead to various problems and potentially serious structural and safety issues. One of the best options for fixing drainage issues is installing a catch basin. Here at Mr. Rooter Plumbing, we specialize in outdoor drain installation and repair.
In today’s post, we will explain how to build a drainage catch basin. We’ll help you understand what it does, why you should install one on your property, and how to install it.
What Is A Drainage Catch Basin?
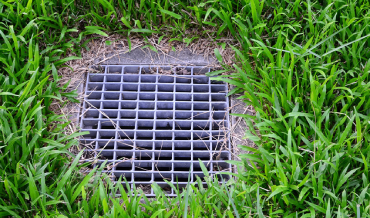
A catch basin is an underground reservoir designed to capture and manage rainwater runoff. The basin consists of two pipes—one that allows water to enter the basin and another pipe that redirects the water to downspout drains or storm sewers. It has a grated or slotted top that allows rainwater to enter while preventing larger objects from clogging the drainage system. Inside the catch basin, sediment settles at the bottom, and the water gradually drains into the municipal stormwater system or nearby natural water bodies.
Step-By-Step Guide For Installing A Drainage Catch Basin
- Step 1: Dig A Hole In The Appropriate Location
Start by selecting the optimal location for your catch basin. Ensure it's strategically placed to capture excess water effectively. Then, dig a hole to accommodate the basin, making sure it's deep enough to accommodate the drainpipe and provide proper drainage.
- Step 2: Form Your Concrete
To create a stable base for your catch basin, create a form using plywood or other suitable materials. The form should match the size and shape of the basin you plan to install.
- Step 3: Install The Drain
Place the drainpipe or drainage system at the bottom of the hole and ensure it has a proper slope to facilitate water flow. Connect it securely to the basin's outlet.
- Step 4: Reinforce The Drain With Rebar
For added stability and strength, insert rebar into the hole before pouring the concrete. This reinforcement will help the catch basin withstand the pressure of the surrounding earth.
- Step 5: Pour The Concrete
Mix and pour concrete into the form around the catch basin. Ensure that the basin is level and that the concrete reaches the desired height. Smooth the surface for a neat finish.
- Step 6: Remove The Plywood Form Once The Concrete Has Cured
Allow the concrete to cure as per the manufacturer's instructions. Once it has sufficiently hardened, carefully remove the plywood form to reveal the catch basin structure. Take your time to avoid damaging the newly poured concrete. You may need to add a few inches of sand to your concrete base to ensure the concrete doesn’t settle.
The final step is to attach a grate to the top of the catch basin. This grate prevents debris from entering the drainage system while allowing water to flow freely. Make sure it fits securely and aligns with the surrounding ground level.
Call Mr. Rooter Plumbing For Professional Catch Basin Installation
We hope this guide will help you successfully install a functional drainage catch basin on your property. However, drainage catch basin installation is a project that requires expertise, experience, and the right tools. If you’re not sure about your skillset, leave the job to a trusted plumbing service. Here at Mr. Rooter Plumbing, we can help you with catch basin installation, drain line repair, drain cleaning, and more. Our reliable plumbers have the skills and experience to install and repair all types of outdoor drains. Contact us today to book an appointment.